
Originally created at Boston’s Parker House Hotel in 1856, this iconic dessert has evolved from a sophisticated hotel delicacy to a cherished homemade treat that brings families together around the dinner table.
Why Boston Cream Pie Matters
When exploring the world of classic American desserts, few treats capture the essence of comfort and elegance quite like this timeless creation. For those interested in perfecting chocolate techniques, you might find inspiration in chocolate fudge cupcakes or explore other decadent options like decadent chocolate layer cake. Additionally, mastering chocolate glazes becomes easier with resources like How to Make Chocolate Ganache, while creative bakers can discover innovative uses for pudding in What to do with instant pudding discussions.
The Boston Cream Pie holds a special place in American culinary history as Massachusetts’ official state dessert. This dessert represents the ingenuity of 19th-century bakers who combined French pastry techniques with American practicality. The original recipe required advanced pastry skills, but modern adaptations have made this elegant dessert accessible to home bakers of all skill levels.
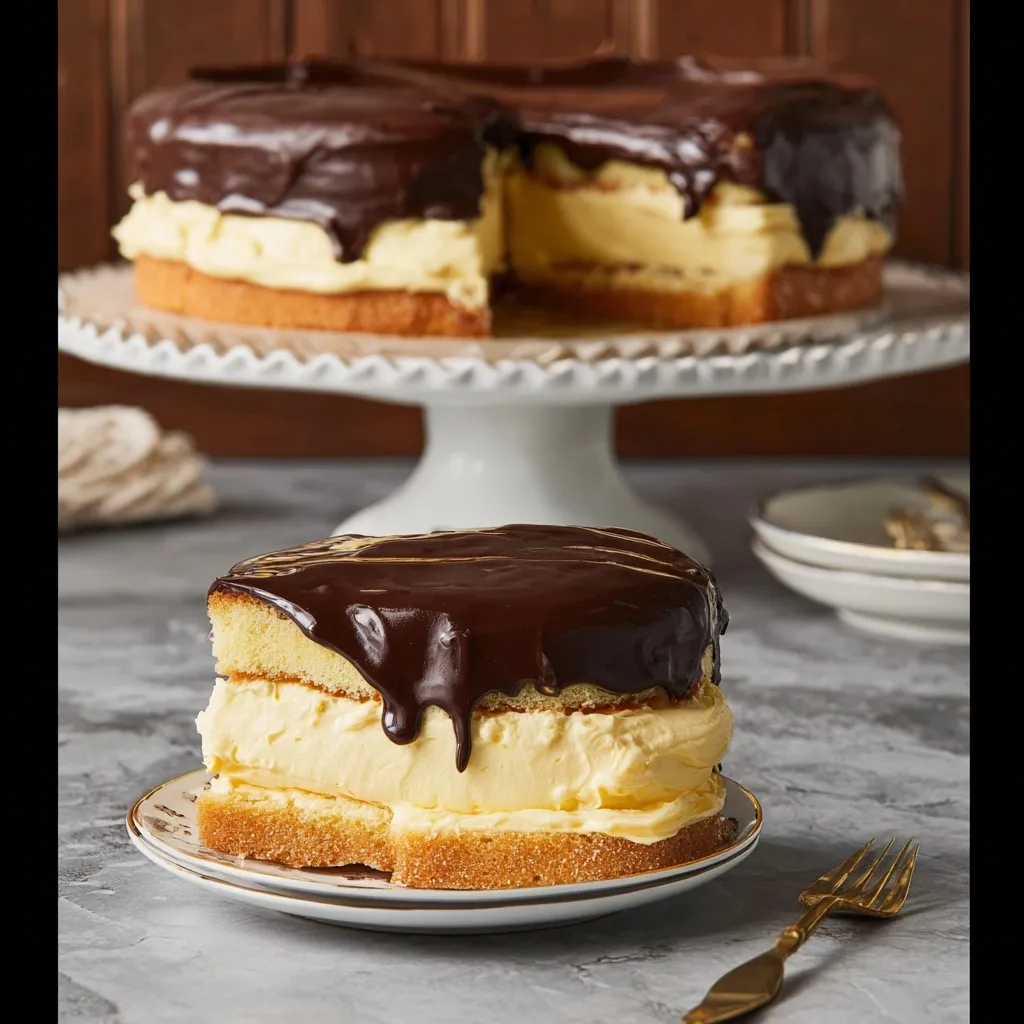
What makes this dessert truly special is its perfect balance of textures and flavors. The light, airy cake provides a delicate foundation, while the smooth vanilla custard adds richness without overwhelming sweetness. The chocolate glaze serves as both a flavor enhancer and a beautiful finishing touch that transforms a simple layer cake into an impressive centerpiece.
Boston Cream Pie Ingredients
Ingredient Spotlight
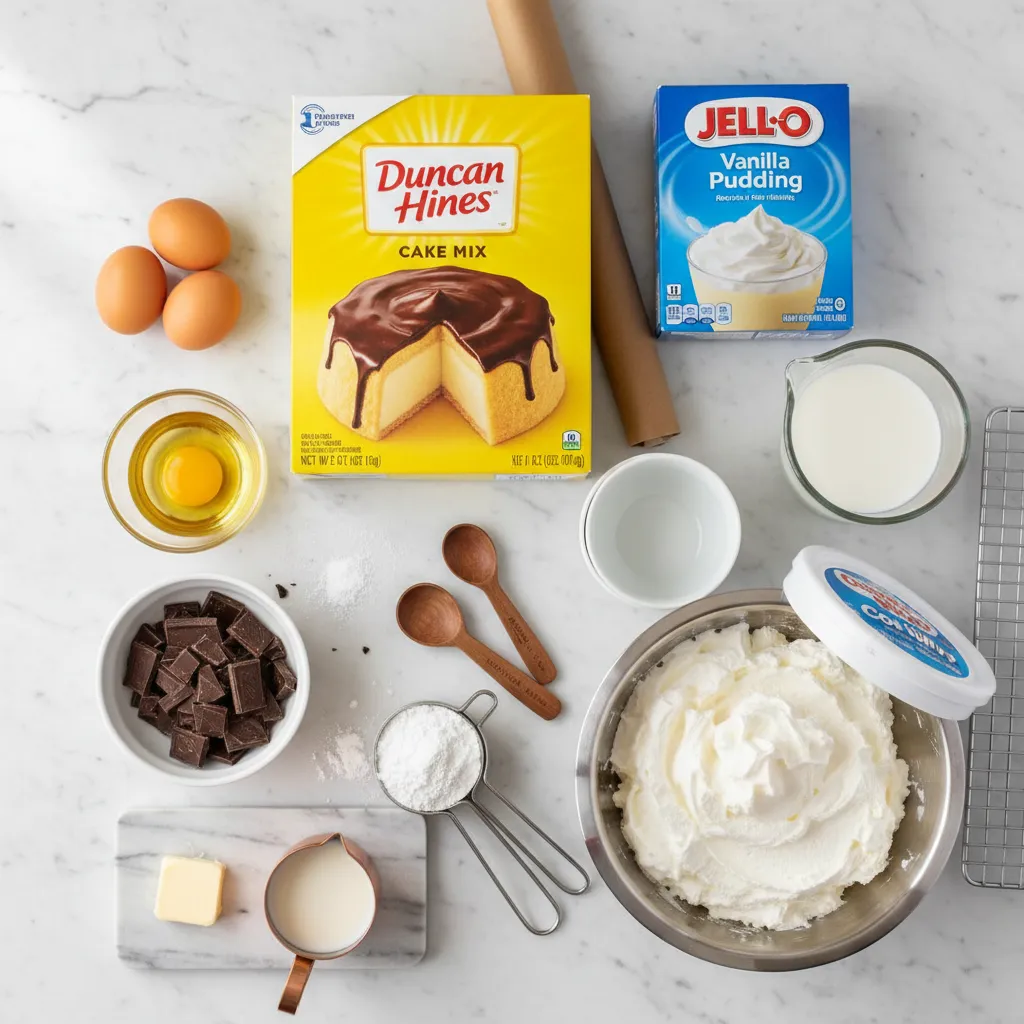
Each component in this Boston Cream Pie recipe serves a crucial purpose in creating the perfect dessert experience. The yellow cake mix provides a reliable foundation with its tender crumb and subtle vanilla flavor, while the instant vanilla pudding creates a silky custard filling that won’t weep or separate when sliced.
Cool Whip or homemade whipped cream lightens the pudding mixture, creating an airy texture that complements the dense cake layers. The unsweetened baking chocolate in the glaze offers rich, intense chocolate flavor without excessive sweetness, while the butter adds glossy shine and smooth consistency.
For the Cake:
- 1 yellow cake mix (plus ingredients called for on package) – creates the tender, vanilla-scented base
For the Filling:
- 1 cup cold milk – activates the pudding mix for proper consistency
- 1 (3.4 ounce) package instant vanilla pudding – provides the signature custard flavor
- 1½ cups Cool Whip or homemade whipped cream – adds lightness and volume
For the Chocolate Glaze:
- 1 (1 ounce) square unsweetened baking chocolate, coarsely chopped – delivers intense chocolate flavor
- 1 tablespoon unsalted butter – creates glossy finish
- ¾ cup powdered sugar – sweetens and thickens the glaze
- 2 tablespoons milk – adjusts consistency for perfect dripping
Substitution Ideas: Replace yellow cake mix with homemade vanilla sponge for extra richness, swap instant pudding for homemade pastry cream for authentic flavor, or use heavy cream whipped to soft peaks instead of Cool Whip for a more natural taste.
Timing
This streamlined Boston Cream Pie recipe requires just 35 minutes of active time, making it 20% faster than traditional scratch recipes that require pastry cream preparation. The preparation takes 10 minutes, baking requires 25 minutes, with an additional hour of chilling time for the best results.
Compared to classic French croquembouche or elaborate layer cakes, this version delivers impressive results with minimal time investment, perfect for busy home bakers who want restaurant-quality desserts.
Step-by-Step Instructions for Perfect Boston Cream Pie
Step 1: Prepare the Cake Foundation
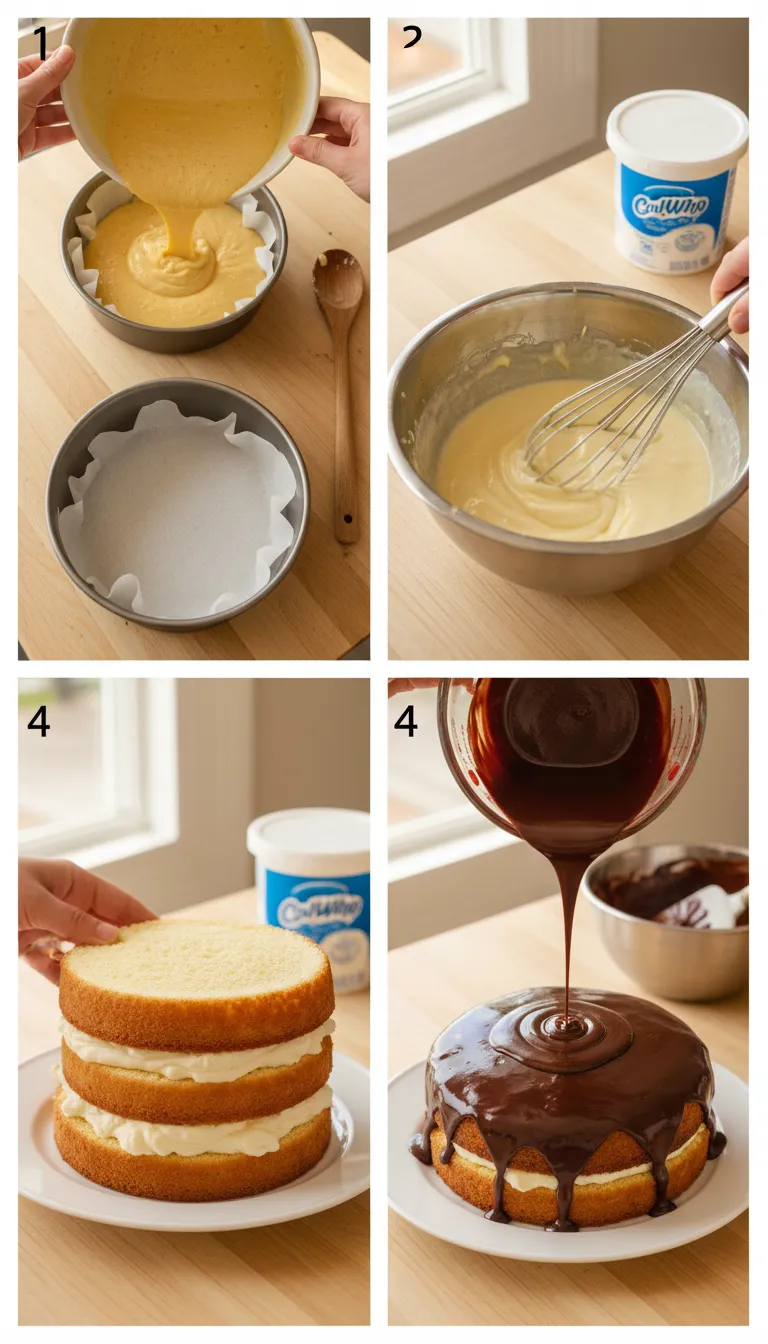
Preheat your oven according to the cake mix package directions, typically 350°F. Line two 9-inch round pans with parchment paper, ensuring the paper extends slightly up the sides for easy removal. Prepare the cake mix following package instructions, but beat the batter for an extra 30 seconds to incorporate more air for a lighter texture.
Step 2: Bake to Golden Perfection
Divide the batter evenly between prepared pans, using a kitchen scale for precision if available. Bake according to package directions until the tops are golden brown and a toothpick inserted in the center comes out clean or with just a few moist crumbs. Avoid overbaking, as this will result in dry cake layers.
Step 3: Create the Vanilla Custard Filling
While the cakes cool, beat the cold milk and pudding mix in a medium bowl for exactly 2 minutes using an electric mixer. The mixture should be thick and smooth. Gently fold in the whipped cream using a rubber spatula, being careful not to deflate the airy texture. Let the mixture stand for 5 minutes to fully set.
Step 4: Assemble the Layers
Once the cakes are completely cool, place the first layer on your serving plate. Spread the pudding mixture evenly over the top, leaving a ½-inch border around the edges to prevent overflow when adding the second layer. Gently place the second cake layer on top, pressing lightly to adhere.
Step 5: Craft the Chocolate Glaze
Microwave the chopped chocolate and butter in a microwave-safe bowl on high for 1 minute. Stir until completely melted and smooth. If needed, microwave in additional 15-second intervals. Whisk in the powdered sugar and milk until the glaze is smooth and has a pourable consistency.
Step 6: Apply the Finishing Touch
Working quickly, pour the warm glaze over the center of the cake, using an offset spatula to spread it evenly across the top. Allow the glaze to naturally drip down the sides for an authentic appearance. Refrigerate the assembled cake for at least 1 hour before serving to set the layers.
Tips & Tricks for Perfect Boston Cream Pie Results
- Temperature Control: Ensure all ingredients are at room temperature before mixing for better incorporation and smoother textures throughout the dessert.
- Pudding Consistency: Use cold milk when preparing the instant pudding to achieve the proper thickness that won’t make the cake layers soggy.
- Glaze Timing: Apply the chocolate glaze while it’s still slightly warm for the smoothest finish and natural dripping effect.
- Assembly Strategy: Place the cake on your final serving plate before adding the filling to avoid messy transfers later.
- Chilling Importance: Allow adequate refrigeration time for the layers to set properly, making clean slicing much easier.
Recipe Variations & Substitutions for Boston Cream Pie
Chocolate Lovers’ Version: Replace the vanilla pudding with chocolate pudding and add chocolate cake layers for a double chocolate experience.
Strawberry Cream Variation: Substitute strawberry pudding and add fresh sliced strawberries between the layers for a fruity twist on the classic.
Mini Individual Portions: Use cupcake pans to create individual Boston cream cupcakes, perfect for parties and portion control.
Gluten-Free Option: Replace the regular cake mix with a high-quality gluten-free yellow cake mix, ensuring the same tender texture for those with dietary restrictions.
Behind the Recipe
This simplified Boston Cream Pie recipe was born from the desire to make this elegant dessert accessible to everyday home bakers. Traditional versions require making pastry cream from scratch, tempering eggs, and mastering delicate custard techniques that can intimidate novice bakers.
By using quality convenience products like instant pudding and cake mix, we’ve maintained the essential flavors and textures that make Boston Cream Pie special while reducing the complexity and time commitment. The result is a dessert that captures the spirit of the original while fitting into modern busy lifestyles.
Pairing Ideas
Serve this rich Boston Cream Pie with freshly brewed coffee or espresso to complement the chocolate glaze. Sparkling apple cider or vanilla-infused sparkling water provides a refreshing contrast to the creamy richness. For special occasions, consider pairing with chai tea or French vanilla hot chocolate.
Light accompaniments like fresh berries or a small serving of fruit salad can balance the dessert’s richness while adding color and freshness to the plate.
Leftover & Reuse Ideas
Transform leftover Boston Cream Pie into decadent trifle by layering crumbled cake pieces with extra pudding and whipped cream in glass bowls. Create Boston cream pie milkshakes by blending cake pieces with vanilla ice cream and milk for a nostalgic treat.
Freeze individual slices wrapped in plastic wrap for up to three months, making them perfect for unexpected guests or personal indulgent moments.
Nutritional Information
Each serving of this Boston Cream Pie contains approximately 380 calories, with 14 grams of fat, 58 grams of carbohydrates, and 6 grams of protein. The dessert provides calcium from the milk and pudding components, along with energy from the balanced combination of carbohydrates and fats.
Serving Suggestions
Present this Boston Cream Pie on a decorative cake stand to showcase the beautiful chocolate glaze drips. Use a sharp, clean knife dipped in warm water between cuts to achieve clean slices that display the distinct layers beautifully.
Garnish individual plates with a light dusting of cocoa powder or a few fresh mint leaves for an elegant restaurant-style presentation that elevates the homemade dessert experience.
Common Mistakes to Avoid
Soggy Bottom Prevention: Never add warm pudding to the cake layers, as this will create a soggy texture. Always allow the pudding mixture to cool completely before assembly.
Glaze Consistency Issues: If the chocolate glaze becomes too thick, add milk one teaspoon at a time. If too thin, add more powdered sugar gradually until reaching the proper consistency.
Uneven Layers: Measure the batter equally between pans using a kitchen scale or by eyeballing and adjusting before baking to ensure even layer heights.
Premature Cutting: Resist the temptation to cut the pie before it has chilled adequately, as the layers need time to set for clean, professional-looking slices.
Storage & Reheating Tips
Store your Boston Cream Pie covered in the refrigerator for up to 4 days, using a cake dome or loose plastic wrap to prevent the glaze from sticking. The dessert actually improves after the first day as the flavors meld together.
This dessert is best served chilled and doesn’t require reheating. If the glaze becomes dull, you can restore its shine by very lightly warming the surface with a hair dryer on low heat for just a few seconds.
FAQs
Can I make Boston Cream Pie ahead of time?
Yes, this Boston Cream Pie can be assembled up to 2 days in advance. In fact, allowing it to chill overnight helps the layers set properly and makes slicing much easier.
What’s the best way to cut Boston Cream Pie cleanly?
Use a sharp knife dipped in warm water and wiped clean between each cut. This prevents the filling from sticking to the blade and ensures neat, professional-looking slices.
Can I freeze Boston Cream Pie for later?
While you can freeze individual slices for up to 3 months, the texture of the pudding filling may change slightly upon thawing. For best results, consume fresh or refrigerated.
How do I prevent the Boston Cream Pie layers from sliding?
Ensure the bottom cake layer is completely cool and the pudding mixture has set for the full 5 minutes before assembly. A slightly textured cake surface helps the filling grip better than a perfectly smooth one.
What can I substitute for instant pudding in Boston Cream Pie?
You can make homemade pastry cream using egg yolks, sugar, cornstarch, and milk, though this requires more time and technique than the instant version used in this simplified recipe.
Conclusion
Boston Cream Pie
This simplified Boston Cream Pie proves that you don’t need professional pastry training to create an impressive, bakery-quality dessert at home. With its perfect balance of fluffy cake, creamy vanilla filling, and rich chocolate glaze, this recipe delivers all the classic flavors that have made this dessert a beloved American tradition for over 150 years.
The beauty of this recipe lies in its accessibility – using quality convenience ingredients to achieve exceptional results without compromising on taste or presentation. Whether you’re celebrating a special occasion or simply treating your family to something extraordinary, this Boston Cream Pie will become a cherished addition to your dessert repertoire.
Made this recipe? Drop your twist in the comments, rate the recipe, and tag us on Facebook, Instagram with #recipehoney.com we might feature your creation!
Boston Cream Pie – Best Easy Perfect Homemade Recipe
Ingredients
Instructions
- Preparing the Cake: Preheat oven and prepare cake mix according to package directions. Line two 9-inch round pans with parchment paper or spray thoroughly with cooking spray. Bake cake according to package directions until golden brown and center passes the toothpick test. Let cakes cool on a wire rack.
- Making the Filling: Beat 1 cup of milk and pudding mix in a medium bowl for 2 minutes. Gently fold in whipped cream. Let stand 5 minutes.
- Assembling Layers: Stack cake layers on serving plate, spreading pudding mixture between layers.
- Preparing the Glaze: Microwave chocolate and butter on high for one minute. Stir until melted. Add powdered sugar and 2 tablespoons milk; mix until smooth. Spread over cake immediately, letting it drip down the sides.
- Chilling: Refrigerate at least one hour before serving.