
Transform your Halloween party into a spine-chilling experience with Halloween zombie guts so realistic, your guests will scream before they realize it’s delicious food. This terrifying Halloween zombie guts recipe creates the perfect illusion of gruesome intestines while delivering mouth-watering flavors that will have everyone coming back for more.
Finding Halloween party food that’s both genuinely scary-looking and actually tasty can be challenging. Most spooky appetizers either look fake or taste terrible, leaving party hosts frustrated and guests disappointed. You need something that delivers maximum shock value without sacrificing flavor or requiring professional culinary skills.
Master this foolproof zombie guts recipe that delivers maximum shock value with minimal effort. In just 30 minutes, you’ll create realistic-looking zombie guts using simple ingredients like puff pastry, savory meat filling, and clever presentation techniques. This spooky party food will become the centerpiece of your Halloween celebration, guaranteed to impress guests of all ages.
Table of Contents
Complete Halloween Zombie Guts Ingredients List (6-8 Servings)
Creating authentic-looking Halloween zombie guts requires carefully selected ingredients that work together to achieve both the perfect texture and gruesome appearance. This comprehensive ingredient list includes everything needed for the base recipe plus creative alternatives for different dietary needs.
Essential Puff Pastry Base Ingredients
The foundation of your zombie guts lies in high-quality puff pastry that will create the perfect intestinal texture:
- 2 sheets frozen puff pastry, thawed (17.3 oz package)
- 1 large egg, beaten (for egg wash)
- 2 tablespoons whole milk
- 1 teaspoon olive oil for brushing
Savory Meat Filling Components
The filling creates the realistic “gore” effect while providing delicious flavor:
- 1 pound ground beef (85/15 lean ratio works best)
- 1 medium yellow onion, finely diced
- 3 cloves garlic, minced
- 1 cup whole milk cottage cheese
- 1/2 cup shredded mozzarella cheese
- 2 tablespoons tomato paste
- 1 teaspoon smoked paprika
- 1/2 teaspoon black pepper
- 1 teaspoon salt
- 1/4 teaspoon red pepper flakes
Vegetarian Alternative Options
For guests with dietary restrictions, these substitutions maintain the authentic zombie guts appearance:
- Plant-based ground meat substitute (Beyond or Impossible brands)
- Finely chopped mushrooms and walnuts mixture
- Lentil and vegetable filling with similar seasonings
- Vegan cottage cheese alternative
Gore Effect Enhancers
These ingredients create the realistic bloody appearance that makes your Halloween zombie guts truly terrifying:
- 3 tablespoons ketchup
- 1 tablespoon pomegranate molasses
- 2 drops natural red food coloring
- 1 teaspoon cornstarch (for thickening)
Step-by-Step Zombie Guts Preparation Method
Proper preparation is crucial for creating Halloween zombie guts that look authentically gruesome while maintaining food safety standards. This detailed method ensures your spooky party food turns out perfectly every time.
Preparing the Savory Meat Filling
Begin by heating a large skillet over medium-high heat. Add the ground beef and cook for 8-10 minutes, breaking it apart with a wooden spoon until completely browned. The meat should develop a rich, deep color with no pink remaining. Drain excess fat, leaving about 1 tablespoon in the pan for flavor.
Add the diced onion to the cooked beef and sauté for 4-5 minutes until softened and translucent. Stir in the minced garlic and cook for an additional minute until fragrant. The aromatics create the savory base that makes your zombie guts recipe irresistibly delicious despite its frightening appearance.
Season the mixture with salt, black pepper, smoked paprika, and red pepper flakes. Stir in the tomato paste and cook for 2 minutes, allowing it to deepen in color and concentrate its flavor. This step adds richness and helps create the realistic “bloody” color that enhances the gore effect.
Creating the Cottage Cheese Mixture
In a separate bowl, combine the cottage cheese with shredded mozzarella. The cottage cheese provides the chunky, organ-like texture that makes your Halloween zombie guts look authentically disgusting. Mix thoroughly until well combined, ensuring even distribution of both cheeses.
Fold the cheese mixture into the cooked meat, stirring gently to maintain the cottage cheese’s lumpy texture. This contrast between smooth and chunky elements creates the realistic intestinal appearance that will shock your party guests.
Cooling and Temperature Tips
Allow the filling to cool completely before using, approximately 20-30 minutes at room temperature or 10 minutes in the refrigerator. Hot filling will melt the puff pastry and create a soggy texture instead of the crispy exterior needed for authentic zombie guts.
Test the temperature by touching the center of the mixture – it should feel cool to room temperature. Proper cooling ensures your pastry maintains its flaky layers and creates the perfect textural contrast between crispy exterior and savory interior.
Shaping and Filling Your Halloween Zombie Guts for Maximum Spook Factor
The shaping process transforms ordinary puff pastry into convincingly gruesome zombie guts that will be the star of your spooky party food spread. Attention to detail during this stage determines how realistic your final creation appears.
Puff Pastry Cutting Techniques
Roll out the thawed puff pastry on a lightly floured surface to approximately 12×15 inches. Using a sharp knife or pizza cutter, create irregular strips varying from 2-4 inches in width. Avoid perfectly straight cuts – zombie guts should look organic and uneven.
Create some strips longer than others, ranging from 8-12 inches in length. This variation mimics the natural irregularity of intestines and adds to the realistic gore effect. For expert techniques on working with puff pastry, check out this guide on Mastering Puff Pastry Techniques.
Proper Filling Distribution
Place 2-3 tablespoons of the cooled meat and cheese mixture along one long edge of each pastry strip, leaving a 1/2-inch border. Avoid overfilling, as this will prevent proper sealing and cause the guts to burst during baking, though some spillage actually enhances the gore effect.
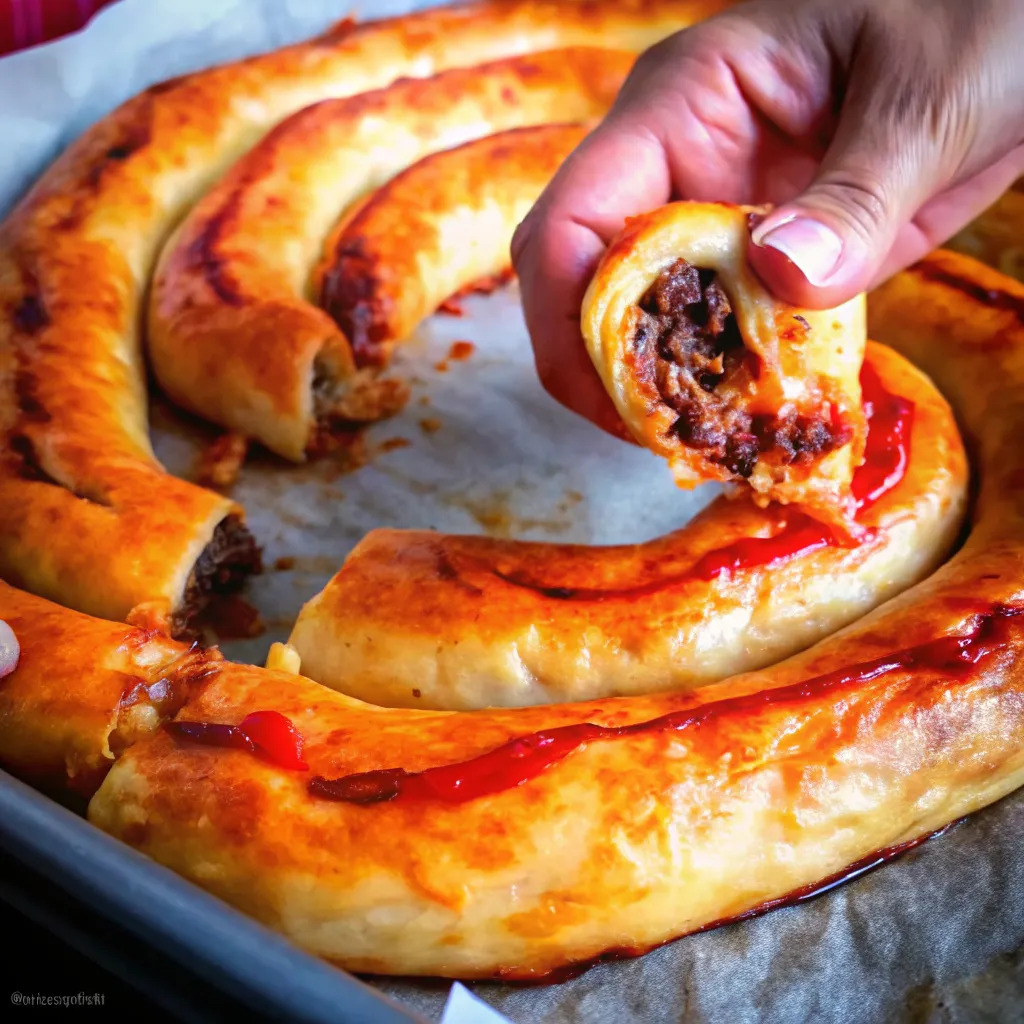
Distribute the filling unevenly within each strip to create natural-looking bulges and indentations. Real intestines aren’t uniform, so embrace the imperfections that make your Halloween zombie guts recipe look authentically terrifying.
Sealing Methods for Realistic Appearance
Brush the edges of each pastry strip with the beaten egg wash. Roll the pastry around the filling, starting from the filled edge and working toward the opposite side. Press the seam gently but don’t smooth it completely – visible seams add to the realistic intestinal texture.
Pinch the ends closed and twist them slightly to create the segmented appearance of real guts. Place each sealed “gut” seam-side down on parchment-lined baking sheets, spacing them about 2 inches apart to allow for expansion during baking.
Creating Realistic Gore Effects That Will Shock Your Guests
The gore effects separate mediocre Halloween food from truly spectacular zombie guts that create lasting memories. These professional techniques use food-safe ingredients to achieve maximum shock value while maintaining delicious flavor.
Natural Coloring Techniques
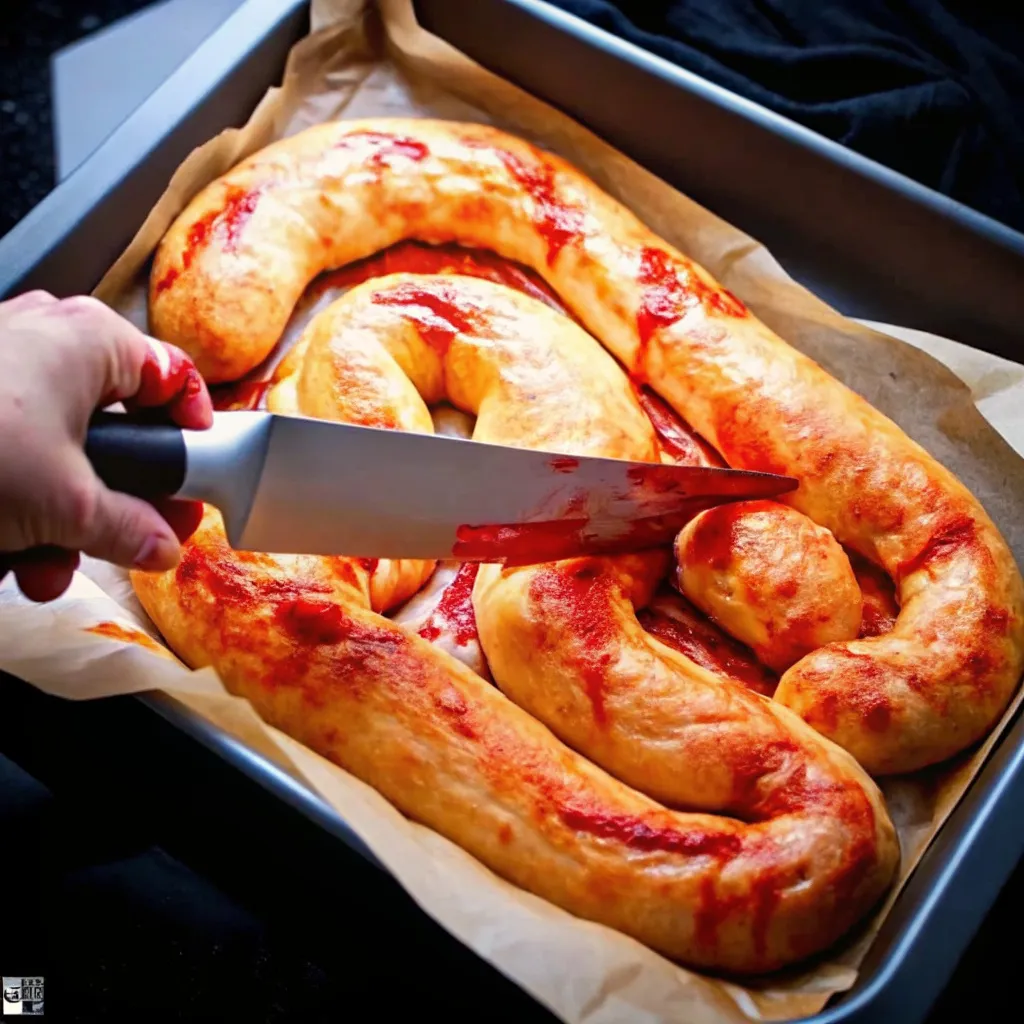
Create your “blood” mixture by combining ketchup, pomegranate molasses, and red food coloring in a small bowl. The pomegranate molasses adds depth and realistic darkness to the color while providing subtle sweetness that complements the savory filling.
Whisk in cornstarch to thicken the mixture to a syrup-like consistency. This prevents the “blood” from running off too quickly while maintaining enough flow to look realistic. For more advanced coloring techniques, explore this comprehensive guide on Natural Food Coloring for Desserts.
Test the color on a small piece of baked pastry first. The ideal shade should be deep red with brown undertones, mimicking dried blood rather than bright red that looks obviously fake.
Texture Enhancement Methods
Before baking, use a sharp knife to make small, shallow cuts along the length of each gut. These “wounds” will open during baking, revealing the filling inside and creating natural-looking tears that enhance the gruesome appearance.
Brush some areas with extra egg wash and others lightly with olive oil to create varying textures and colors across the surface. This irregularity mimics the natural variation in real tissue and makes your Halloween zombie guts look more authentic.
Food-Safe Gore Effects
Apply the blood mixture strategically after baking while the guts are still warm. Focus on the cut areas and seams where blood would naturally pool. Use a pastry brush or clean paintbrush for precise application.
Sprinkle small amounts of the remaining cottage cheese mixture around the serving platter to simulate scattered organ pieces. This detail elevates your presentation from simple appetizer to convincing Halloween horror scene.
Baking Your Halloween Zombie Guts to Perfection
Proper baking technique ensures your zombie guts recipe achieves the perfect balance of crispy exterior and juicy interior while maintaining the realistic appearance that makes this spooky party food so effective.
Optimal Oven Settings
Preheat your oven to 400°F (200°C) and position racks in the upper and lower thirds. This temperature provides sufficient heat to create golden, flaky pastry while cooking the filling thoroughly without burning the delicate exterior.
Use convection setting if available, reducing temperature to 375°F (190°C). The circulating air creates more even browning and helps achieve the varied textures that make your Halloween zombie guts look authentically gruesome.
Timing for Perfect Texture
Bake for 20-25 minutes, rotating the pans halfway through cooking time. The pastry should develop a rich golden-brown color with darker spots that enhance the realistic appearance. Some areas may appear slightly charred – this actually improves the gore effect.
If using two racks, switch pan positions when rotating to ensure even cooking. The bottom rack typically browns more quickly, so monitor closely during the final 5 minutes to prevent over-browning.
Signs of Proper Doneness
Look for golden-brown pastry that sounds hollow when tapped lightly. The cuts you made should have opened during baking, revealing the cooked filling inside. Some filling may have leaked out – this spillage actually enhances the realistic gore effect of your Halloween zombie guts.
Internal temperature should reach 165°F (74°C) when measured with an instant-read thermometer inserted into the thickest part of the filling. The pastry should feel firm but not hard, maintaining some give when pressed gently.
Serving and Presentation Ideas for Maximum Halloween Impact
Presentation transforms your delicious Halloween zombie guts from simple appetizer to unforgettable party centerpiece. These creative serving suggestions maximize the shock value while maintaining easy access for hungry guests.
Spooky Plating Techniques
Arrange the baked zombie guts on a large dark wooden cutting board or black serving platter to enhance the gruesome appearance. Drizzle additional “blood” mixture around the platter and let it pool naturally for maximum effect.
Scatter torn lettuce leaves around the edges to simulate rotting vegetation, and add small bowls of extra filling as “organ chunks.” The contrast between the realistic gore and elegant serving pieces creates cognitive dissonance that makes the presentation even more shocking.
For additional spooky presentation inspiration, explore these Spooky Halloween Food Presentation Ideas that complement your zombie guts perfectly.
Party Presentation Suggestions
Create a complete Halloween horror buffet by pairing your zombie guts with other themed appetizers. Consider adding a Spooky Rat Cake for Halloween as a companion dessert that continues the gruesome theme while offering sweet contrast to the savory guts.
Set up dim lighting with flickering candles or colored LED lights to enhance the spooky atmosphere. Position the zombie guts as the centerpiece, surrounded by other themed foods and Halloween decorations that reinforce the horror theme without overwhelming the food.
Provide small plates and cocktail napkins in Halloween colors, and consider adding tent cards with gruesome names like “Fresh Intestines” or “Zombie Innards” to enhance the theatrical presentation. For easy party treats to round out your spread, try this Easy Crockpot Candy for Parties recipe.
Storage and Reheating Tips
Store leftover zombie guts in airtight containers in the refrigerator for up to 3 days. The pastry will soften slightly, but the flavors actually improve as they meld together overnight.
Reheat in a 350°F (175°C) oven for 8-10 minutes to restore crispness to the pastry. Avoid microwaving, as this creates soggy texture that diminishes both appearance and taste. Apply fresh “blood” mixture after reheating for best visual impact.
For make-ahead preparation, assemble the zombie guts completely and freeze unbaked for up to 1 month. Bake directly from frozen, adding 5-7 minutes to the cooking time. This advance preparation allows you to focus on other party elements while ensuring your Halloween zombie guts remain the star attraction.
Frequently Asked Questions
Can I make Halloween zombie guts ahead of time for my party?
Yes, Halloween zombie guts can be prepared several ways for advance planning. Assemble completely and freeze unbaked for up to one month, then bake directly from frozen with 5-7 extra minutes cooking time. Alternatively, bake completely up to 2 days ahead and store refrigerated, then reheat at 350°F for 8-10 minutes before serving. The filling can be prepared up to 3 days in advance and refrigerated, making final assembly quick and easy on party day.
What are the best substitutes for meat in zombie guts recipe?
Plant-based ground meat substitutes work excellently in this zombie guts recipe, maintaining the chunky texture essential for realistic appearance. Beyond or Impossible brand products provide the best meat-like consistency. For vegetarian options, try finely chopped mushrooms mixed with walnuts, seasoned lentil mixture, or seasoned cauliflower crumbles. Ensure any substitute holds together well and provides similar protein content for satisfying party food.
How do I make Halloween zombie guts look more realistic and scary?
Enhance realism by varying the “blood” application – use darker concentrations in crevices and lighter drizzles on surfaces. Add texture with cottage cheese scattered around the plate as “organ chunks.” Create intentional tears in the pastry before baking to reveal filling. Use irregular shaping rather than uniform pieces, and employ dramatic lighting with shadows to emphasize the gruesome details that make your Halloween zombie guts truly terrifying.
Is this Halloween zombie guts recipe suitable for kids?
This Halloween zombie guts recipe can be modified for children by reducing the gore effects and focusing on the fun factor rather than horror. Use less “blood” mixture, create more cartoon-like shapes, and present on colorful plates rather than dark serving pieces. The flavors are kid-friendly, resembling familiar meat pastries. Consider making smaller portions and involving children in the assembly process for educational fun.
What should I serve alongside zombie guts at Halloween party?
Complement your Halloween zombie guts with other themed appetizers that maintain the spooky atmosphere. Include finger foods like “mummy” wrapped items, “graveyard” dips with tortilla chip tombstones, and “spider” deviled eggs. Balance savory guts with sweet treats, themed punch or cider, and ensure variety in textures and temperatures. Consider dietary restrictions with vegetarian and gluten-free options to accommodate all guests at your Halloween celebration.
How long do Halloween zombie guts stay fresh?
Properly stored Halloween zombie guts remain fresh for 3-4 days refrigerated in airtight containers. The pastry softens over time but flavors improve as ingredients meld. For best texture, consume within 24 hours of baking. Frozen unbaked guts maintain quality for up to 3 months. Always reheat thoroughly to 165°F internal temperature before serving leftovers, and refresh the “blood” effect for optimal presentation.
Why use pomegranate molasses instead of balsamic vinegar?
Pomegranate molasses provides a rich, dark color with tangy-sweet flavor that works beautifully for creating realistic “blood” effects. It offers a more concentrated flavor than balsamic vinegar and creates the perfect consistency when mixed with ketchup and cornstarch. The natural tartness complements the savory filling while adding depth to the gore effect. Plus, it’s readily available in most grocery stores and adds an authentic Middle Eastern touch to the flavor profile.
Your Halloween zombie guts recipe represents the perfect fusion of culinary creativity and theatrical presentation, delivering both visual shock value and genuine deliciousness that will make your party unforgettable. This versatile recipe adapts easily to different dietary needs while maintaining its gruesome appearance, ensuring every guest can enjoy the spine-chilling experience.
The realistic gore effects and savory flavors create a memorable centerpiece that photographs beautifully and generates conversation long after the party ends. Whether hosting intimate gatherings or large celebrations, these zombie guts scale perfectly while maintaining their impact and authenticity.
Take your Halloween entertaining to the next level by mastering this show-stopping recipe and experimenting with your own creative variations. Share your gruesome creations with fellow Halloween enthusiasts and inspire others to elevate their spooky party food game. For an impressive dessert finale, consider pairing your zombie guts with these Decadent Chocolate Fudge Cupcakes Recipe decorated with Halloween themes for a complete horror-themed menu that satisfies every craving.