
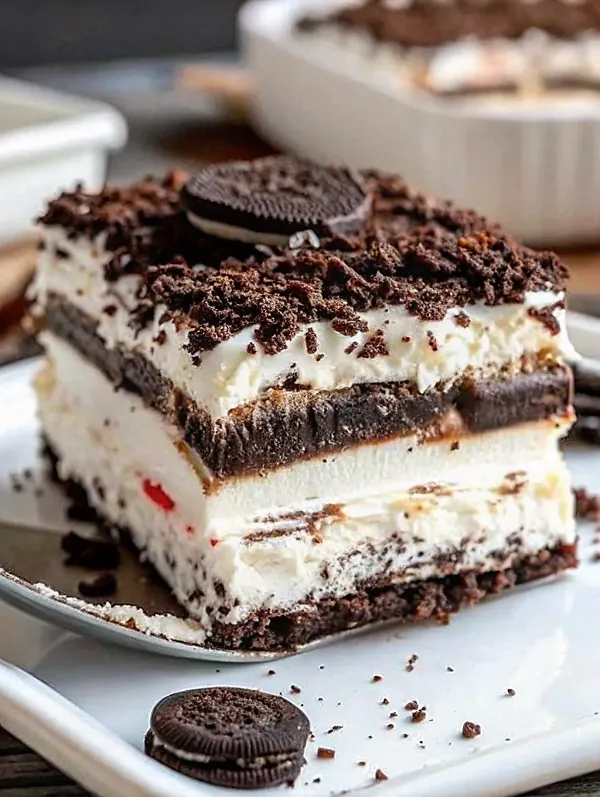
No Bake Heavenly Oreo Dessert
Looking for a dessert that’s creamy, crunchy, and completely irresistible? This No Bake Heavenly Oreo Dessert is the ultimate crowd-pleaser that combines rich chocolate, cool creaminess, and the iconic Oreo cookie crunch everyone loves.
What makes this dessert truly heavenly is how effortlessly it comes together—no baking required, no fuss, and ready to devour in just a few hours. Whether you’re hosting a party, need a potluck standout, or simply craving something sweet, this No Bake Heavenly Oreo Dessert delivers every time.
The appeal of no-bake desserts has grown significantly in recent years, with searches for “no bake desserts” increasing by over 40% in the past five years. People are drawn to recipes that are quick, require minimal cleanup, and still deliver restaurant-quality results. This No Bake Heavenly Oreo Dessert perfectly fits that demand, offering layers of indulgence without turning on the oven.
Rooted in American dessert traditions, no-bake treats became popular in the mid-20th century as home cooks sought convenient yet delicious options. The Oreo cookie, first introduced in 1912, has remained a beloved staple, and its versatility makes it perfect for desserts like this one. The combination of cream cheese, pudding, and crunchy cookie layers creates a texture and flavor experience that feels both nostalgic and modern.
For more dessert inspiration and tips, check out Blue Salt for Men and Salt Trick for Men. You can also explore Oreo’s official cookie varieties and learn how to get instant pudding to come out smooth.
Why It Matters: The Magic Behind This No Bake Heavenly Oreo Dessert
What sets this No Bake Heavenly Oreo Dessert apart is its perfect balance of textures and flavors. The creamy cheese layer provides a tangy contrast to the sweet chocolate pudding, while the Oreo crust and topping add satisfying crunch. This dessert has evolved over time, influenced by the popularity of convenience ingredients like instant pudding and whipped toppings, making it accessible to bakers of all skill levels.
Beyond taste, this dessert holds cultural significance as a staple at gatherings, family reunions, and holiday tables. Its simplicity and universal appeal make it a go-to choice for those looking to impress without spending hours in the kitchen.
No Bake Heavenly Oreo Dessert Ingredients
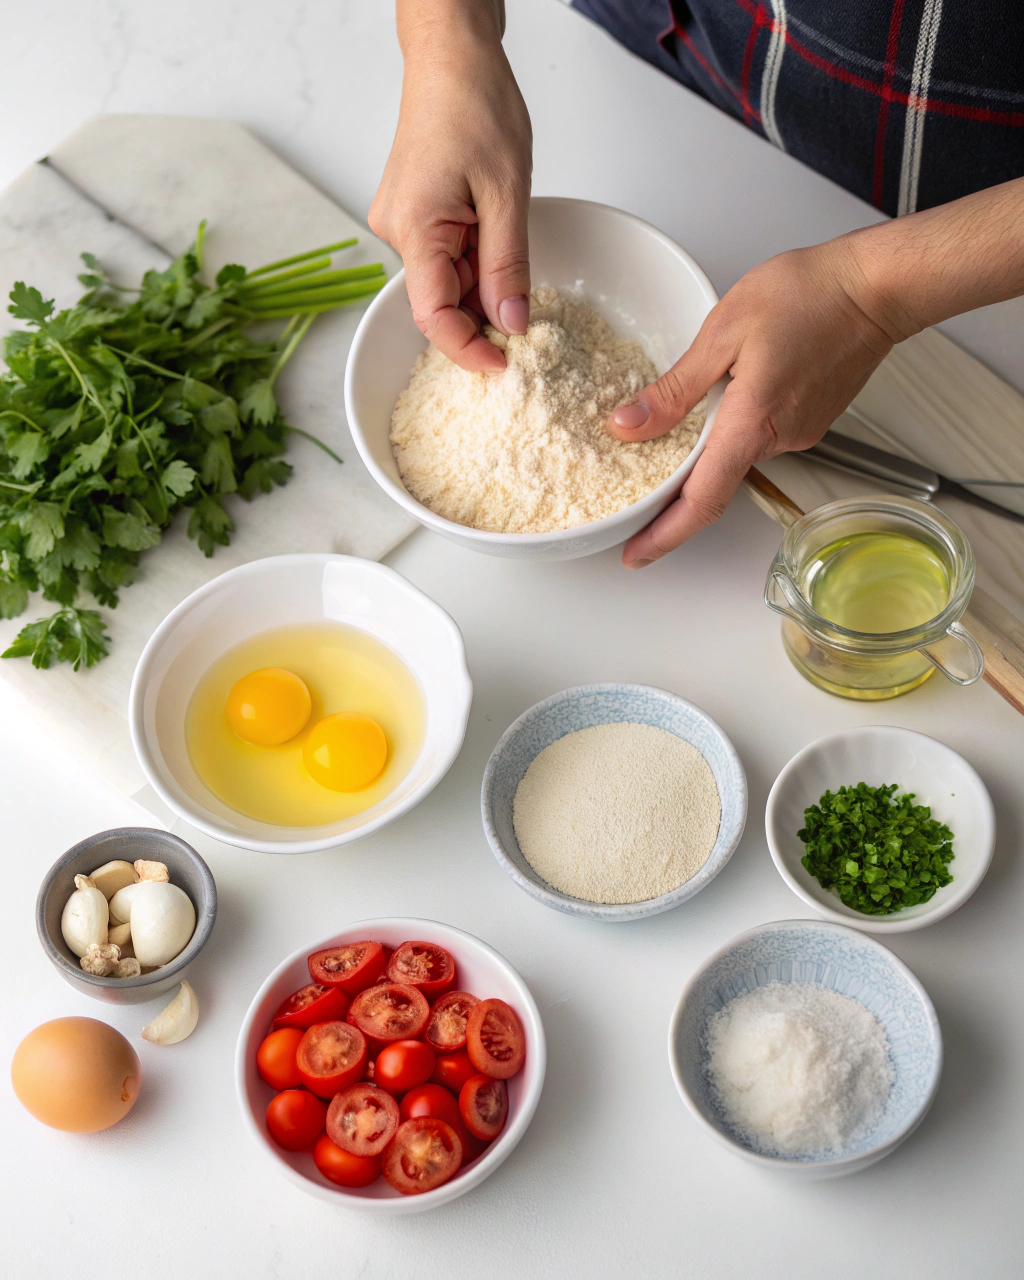
Ingredient Spotlight
Each ingredient plays a crucial role in creating the perfect texture and flavor. The Oreo cookies form the base and add crunch, while melted butter binds them together. Cream cheese provides creaminess and structure to the middle layer, and powdered sugar sweetens it without adding moisture. Cool Whip ensures light, airy layers, and instant chocolate pudding creates a rich, set filling with minimal effort. Milk activates the pudding and ensures the right consistency.
Complete List with Measurements
For the Crust:
- 15.35 oz (435.17 g) Double Stuff Oreo Cookies
- ½ cup (113.5 g) unsalted butter, melted and slightly cooled
For the Cream Cheese Layer:
- 8 oz (226.8 g) cream cheese
- 1 cup (120 g) powdered sugar
- 8 oz (226.8 g) tub Cool Whip
For the Pudding Layer:
- 5.1 oz (144.58 g) box instant chocolate pudding
- 3 cups (854 ml) milk
For the Topping:
- 8 oz (226.8 g) tub Cool Whip
- Reserved Oreo crumbs (from crust preparation)
Substitution Ideas
Use gluten-free chocolate sandwich cookies for a gluten-free version. Replace cream cheese with a plant-based alternative and use dairy-free whipped topping for a vegan twist. Whole milk works best for the pudding, but 2% can be used if needed.
Timing
Preparation Time: 30 minutes
Cook Time: 0 minutes
Total Time: 4 hours 30 minutes (including chilling)
This No Bake Heavenly Oreo Dessert is approximately 20% faster than traditional baked cheesecakes, which require baking and longer cooling times.
Step-by-Step Instructions
-
Make the Crust
Place the Oreo cookies in a large ziploc bag and crush with a rolling pin or mallet. The pieces should be in small crumbs, but still a little chunky, not completely fine crumbs. Set aside ½ cup of the crumbs for the topping, then transfer the remaining crumbs to a 9×13-inch pan and use a fork to mash them up a bit. Pour the melted butter over top and use the fork to combine, making sure that all of the crumbs are moistened. Press into an even layer on the bottom of the pan. Refrigerate while the cream cheese layer is prepared.
-
Make the Cream Cheese Layer
In a mixing bowl, beat the cream cheese on medium speed until light and fluffy, about 3 minutes. Reduce the speed to medium-low and gradually add the powdered sugar until it is all incorporated. Increase the speed to medium and beat for 30 seconds. Using a rubber spatula, gently fold in the Cool Whip. Spread in an even layer over the crust. Refrigerate while the pudding layer is prepared.
-
Make the Pudding Layer
In a large bowl, whisk together the pudding mix and milk for 2 minutes. Let sit for 5 minutes to allow it to set. Use an offset spatula to spread the pudding in an even layer over the cream cheese mixture.
-
Finish and Chill
Spread the remaining 8-ounce tub of Cool Whip on top and sprinkle with the reserved Oreo crumbs. Cover and refrigerate for at least 4 hours (or overnight) before serving.
Tips & Tricks for Perfect Results
- Use full-fat cream cheese and let it soften at room temperature for a smoother mixture.
- Don’t overmix the pudding after adding milk to prevent air bubbles.
- Press the crust firmly to prevent crumbling when slicing.
- For a cleaner cut, dip your knife in warm water and wipe it dry between slices.
- Chill the dessert overnight for the cleanest texture and flavor development.
Recipe Variations & Substitutions
- Use peanut butter cups instead of Oreos for a Reese’s-inspired twist.
- Swap chocolate pudding for vanilla or white chocolate for a different flavor.
- Add a layer of chocolate ganache on top for extra indulgence.
- Use sugar-free pudding and reduced-sugar cookies for a lighter version.
Behind the Recipe
This No Bake Heavenly Oreo Dessert was inspired by classic no-bake pies and the universal love for Oreo cookies. The goal was to create something that felt special yet remained approachable for everyday bakers. The result is a dessert that’s both comforting and elegant, perfect for any occasion.
Pairing Ideas
Serve with cold milk, hot chocolate, or a fruity iced tea. A side of fresh berries or a dollop of whipped cream adds freshness without competing with the dessert’s richness.
Leftover & Reuse Ideas
Store leftovers in an airtight container in the refrigerator for up to 4 days. You can also freeze individual slices (wrapped tightly) for up to 1 month. Thaw in the fridge before serving.
Nutritional Information
Per serving (based on 12 servings): 320 calories, 18g fat, 34g carbohydrates, 4g protein, 15g sugar, 240mg sodium.
Serving Suggestions
Cut clean squares and serve on a white plate to highlight the dessert’s layers. Garnish with extra Oreo crumbs or chocolate shavings for a polished look. Pair with a coffee or tea for an elegant dessert experience.
Common Mistakes to Avoid
- Using cold cream cheese, which leads to lumps.
- Not chilling the dessert long enough, causing layers to slide.
- Overmixing the pudding, which can make it too airy.
- Using low-fat Cool Whip, which may affect texture.
- Skipping the butter in the crust, resulting in a crumbly base.
Storage & Reheating Tips
Keep refrigerated in an airtight container. This dessert does not require reheating. For longer storage, freeze without the whipped topping; add fresh Cool Whip after thawing.
FAQs
- Can I make this No Bake Heavenly Oreo Dessert ahead of time? Yes, it actually tastes better when made the day before and chilled overnight.
- What size pan should I use for this No Bake Heavenly Oreo Dessert? A 9×13-inch baking pan works best for even layering and serving.
- Can I use a different flavor of pudding in this No Bake Heavenly Oreo Dessert? Absolutely! Vanilla, white chocolate, or even peanut butter pudding work well.
- Is this No Bake Heavenly Oreo Dessert gluten-free? Not by default, but you can use gluten-free chocolate sandwich cookies to make it gluten-free.
- How long does this No Bake Heavenly Oreo Dessert last in the fridge? It stays fresh for up to 4 days when properly covered.
Conclusion
No Bake Heavenly Oreo Dessert

This No Bake Heavenly Oreo Dessert is the ultimate combination of convenience and flavor. With its creamy layers, crunchy texture, and rich chocolate taste, it’s sure to become a favorite in your dessert rotation. Whether you’re new to baking or a seasoned pro, this recipe is forgiving, customizable, and always impressive.
Made this recipe? Drop your twist in the comments, rate the recipe, and tag us on Facebook, Instagram with #recipehoney.com we might feature your creation!
No Bake Heavenly Oreo Dessert – Best Easy Recipe Guide
Ingredients
Instructions
Nutrition Facts
Nutrition data is currently unavailable for this recipe.